
Learning Python for Spike Prime
Author: Vincent Chen
Today, our team researched the technical advantages of optimising for Python in FLL over scratch coding. A great advantage we found out was that Python for Spike was up to 500% faster than scratch, and that in Python, you could run multiple motor pairs at once, which allows you to prepare an attachment for a mission before you get to it, which proved to be very time efficient. Unfortunately, most tutorials online were outdated due to the fact that they ran with an older version of Python, so we had to learn it by ourselves
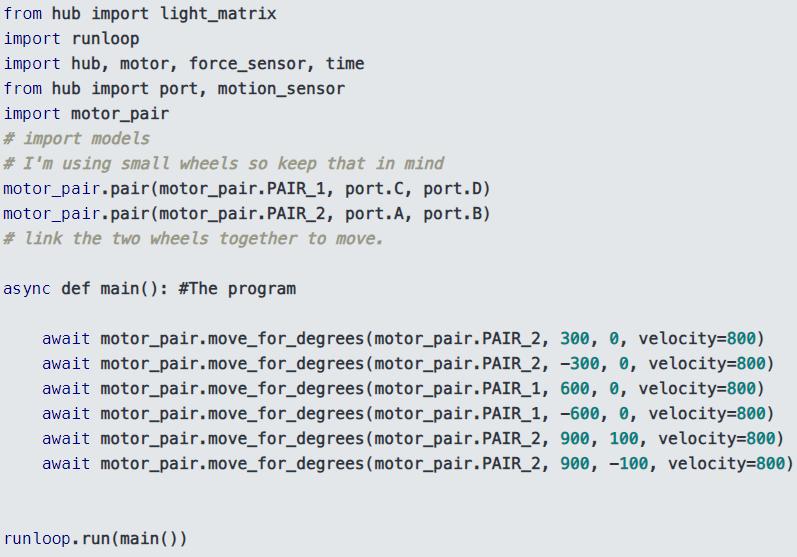
After experimenting with some code, I found out and learnt how to move and turn, as well as wait for an operation to finish before running the next one. I then built a basic code for my teammates to experiment with movement, using a recurring loop to turn and move the robot. I experimented with multiple modules that could ease the coding process. Some very helpful ones that I found included:
— Motor_pair. This module allowed us to pair motors, which allows us to run multiple motors at the same time in opposite directions, which is particularly useful for driving and turning.
— Runloop. This allows us to organise all our code into one function and also allows us to use the “await” prefix, which basically waits until the line is completed before moving to the next line.
— Time. This allows us to delay our program (for accuracy reasons) if required.
— Port. This is one of the most important modules, as it allows us to connect to our robot motors.
— Light_matrix. This is also pretty important, as it triggers the usage of the colour sensors.
— Force_sensor. This is a built-in component of the robot Hub, and allows us to detect forces which act upon the hub.
— Hub, which gives us more modules to work with.
In each line of movement code, it is usually run with:
motor_pair.move_for_degrees(motor_pair.PAIR_2, XXX, YYY, velocity=ZZZ)
I will break down this code. Basically, “motor_pair.move_for_degrees” triggers a built-in function which defaultly moves a pair of motors for XXX degrees. XXX just represents an integer which you put in that decides the amount of degrees that you rotate both motors in motor pair 2. (in some cases, this can be motor pair 1.)
YYY is an integer in the range of -100 to 100, which determines the steering of the movement, with 0 being straight forward. -100 leans to the left whilst 100 leans to the right, and the smaller the value, the larger the robot will arc in that direction. For example, if you put the value “20” in place of YYY, you would be arcing to the right for XXX degrees. Lastly, ZZZ represents the speed at which your robot runs.
ZZZ must also be an integer value, and the speed in percentage is found by ZZZ divided by 1000. For example, if you set ZZZ to 500, then your speed would be ZZZ divided by 1000, which is 50 percent. This also allows you to control the accuracy, as usually a slower speed will allow your code to run more precisely, whilst a faster code tends to be slightly more inaccurate. In the example which I used to help my teammates experiment with the coding, I have used the speed 80%.
Another important factor of the coding that is absolutely crucial to the consistency of the robot performance is to take into account traction. For example, if you balance more weight onto one side of the wheel, turning to that side may be more inaccurate as the robot has to turn whilst holding a heavier weight onto that side. Our team took this into account and during the coding, adapted our steering to match the traction quality of our robot.
As for time delaying, it is reasonably simple to understand. If you wanted to wait for 500 milliseconds, or half a second, you would write this code:
time.sleep_ms(500)
It is also very important that the number you put in the placeholder is also an integer, otherwise the code would generate a TypeError, as it only takes integers into its placeholder.
In summary, that is what we have observed and learned from our own experimentation and curiosity. We have learnt to move the robot, its attachments, separate motors, as well as delay time. We continue to explore this concept because as we mentioned before, Python can be up to 6 times faster than scratch coding.


Leave a Reply